Thursday, January 3, 2008
More of My Favorite Things

Wednesday, January 2, 2008
"These are a few of My Favorite Things!"
This card was made with an image Carolyn sent me from the "Baby, It's Cold Outside" set, and the snowflakes I stamped from the "Winter Blast" set. I colored the image with my Copic markers. Little by little, my collection is growing and I just LOVE those markers! My cardstock is from Archiver's... my 5 freebies that I picked up (love those coupons!) when I bought this snowman paper from The Paper Company Studio. The silver cardstock matting the main image is brushed silver from Stampin' Up. The silver brads... I don't remember where those are from. I sponged Stampin' Up Soft Sky ink around the edges of the card base, and stamped the snowflakes with Ranger clear resist ink. The snowflake on the circle was stamped with Versamagic Night Sky, and embossed with SU! Iridescent Ice. I tied silver organdy ribbon twice around the side panel, and added several frayed pieces of silver cord to mimic the pattern in the snowflake.
This card was created with another great image that Cammie sent me, but the actual name of the stamp set escapes me. I colored this also with my Copic markers. The cardstock is Bazzill and Stampin' Up. The designer paper is from My Mind's Eye (polka dots) and Anna Griffin (stripes). The "make a wish" sentiment is from my Kitchen Sink Stamps set called Happy Birthday Cupcake, is stamped in Versamagic Pink Petunia and embossed with clear EP. I added brads and ric-rac for finishing touches.
More images from Cammie... what a sweetheart she was to send me these! This card uses Stampin' Up cardstock, and Pallette O' Prints designer paper in Certainly Celery. I colored the image with Stampin' Up markers, but colored the background and the sentiment piece with a Copic marker. The flowers stamped in the background on the Taken with Teal piece are also from my Kitchen Sink Stamps Happy Birthday Cupcake set. They match the flowers in the designer paper very nicely, I think!
This card was created for the My Favorite Things sketch challenge #10 on SCS. Used those awesome Copic markers again, and some yummy new Valentine paper from Bo Bunny! Cardstock is all Bazzill, and the dotted ribbon is from May Arts.
This last card was born out of complete desperation! I have several of this stamp set "Winter Blast" at the store, and it didn't sell during the Christmas season. Usually, all I have to do is make a sample with a set or stamp and it'll be gone in a week. Problem is, I couldn't come up with any inspiration for using this set myself! (probably explains why my customers aren't buying it!) So this card is a complet and utter, total CASE of this awesome card by kimreid_stamper on SCS... http://www.splitcoaststampers.com/gallery/photo/729734?si=Winter%20Blast I hope she doesn't mind... I plan to contact her and let her know I CASE'd her card! Anyway, I used Bazzill cardstock for my card, and more of that pretty designer paper from The Paper Company Studio. The penguins were stamped with Versafine ink, and colored with Tombow markers. I then used my Versamarker on the "star," snowball, and snow at their feet and heat embossed with Ranger embossing tinsel. The brads on each side are also from The Paper Company Studio. The snowflakes were cut out with a Cuttlebug die. I sponged French blue Colorbox chalk ink around the edges of the penguins, also. The sentiment is stamped in eggplant Colorbox pigment ink, and embossed with clear EP.Thanks for stopping by! Stamp Happy!
Monday, December 31, 2007
Make a Wish, Cupcake!
This is a Kitchen Sink Stamps cards I created yesterday for the Featured Stamper Challenge on SCS. The FS was Danielle (dlounds) and she has a really nice gallery! I chose to CASE this cards of hers... http://www.splitcoaststampers.com/gallery/photo/731708?cat=500&ppuser=54696 I changed the colors and the ribbon, eliminated the photo turn, and of course used a different stamp set! I really love how this turned out, but it was a lot of work! I don't often get such attention to detail in my work like this, so I'm always glad for an excuse to copy someone else's work for inspirational ideas!Stamps: Kitchen Sink Stamps Happy Birthday Cupcake
Cardstock: Bazzill Basics; Stampin' Up Wild Wasabi and Groovy Guava; Hollo's white
Ink: Versafine Onyx Black; Versamagic Tea Leaves and Persimmon; SU! Groovy Guava
Accessories: clear EP; SU! Iridescent Ice EP; May Arts ribbon; coral grosgrain ribbon; SU! Hodgepodge Hardware, ticket corner punch and large oval punch; paper piercing tool
Thanks for stopping by! Stamp Happy, and Happy New Year!
Friday, December 28, 2007
Limited Supplies
We have a young lady at our church... her mom is our choir director, and her dad is our organist, so it stands to reason that this young lady is very musically inclined. During the Christmas season, she has played her flute several times as accompaniment with some of our choir anthems, and she does an amazing, beautiful job! Her heart is really in it, and you can just tell that she has put in some serious practice time. I have been wanting to send her a card to let her know how much her musical talent is appreciated, so today's Limited Supply Challenge on SCS was the perfect chance to get that card made! You can view the challenge here (http://www.splitcoaststampers.com/forums/showthread.php?t=310003) if you'd like to read what the limits were or if you'd like to join in!Thanks for stopping by! Stamp Happy!
Stamps: Gina K Designs Gettin' Buggy With It; TAC Be Authentic
Cardstock: plain white; striped and multi-dot DP from Paper Salon; background green dotted DP from Anna Griffin
Ink: Versafine Onyx Black; Versamagic Spanish Olive; Tombow markers for the butterfly; Stampin' Up Cool Caribbean to sponge around the main image edges
Accessories: American Crafts ribbon; foam squares
For my Wonderful Mom
This card is for my wonderful Mom. Today was her last full day of being the Activity Director at the nursing home where she has worked for years and years, and now she begins semi-retirement! She has always been so great at what she does there... planning events, etc. and is so well-loved by everyone. Her replacement has very big shoes to fill! I wanted to make her a beautiful card to mark the occasion and to let her know how proud I am of the wonderful work she's done for the residents of the nursing home. If you know a resident or staff member of Fulton Manor in Wauseon, Ohio ask them if they know Kay, the activity director! I guarantee they'll have nothing but good things to say! My Mom is the best!Stamps: Kitchen Sink Stamps 3-Step Daisy and Never a Loss 4 Words
Cardstock: Bazzill Basics; Hollo's white; designer paper from Deja Views
Ink: Versamagic chalk inks: Spring Pansy, Purple Hydrangeo and Eggplant (daisies), Tea Leaves and Spanish Olive (leaves), Eggplant (sentiment)
Accessories: Color Spritzer with Tombow markers #098 and 676; sponges; Stampin' Up olive organdy ribbon; Stampin' Up photo corner punch; silver brads (source unknown); clear EP (sentiment), paper piercing tool; foam squares

This card is for my step-Dad, Keith. His birthday was last week and I forgot to send a card (as usual!) So I thought as long as I was sending a card to my Mom, I could get one sent to him, too!
Stamps: Pink Cat Studio (classic car); Impression Obsession (sentiment); Kitchen Sink Stamps (stripes)
Cardstock: Stampin' Up Sage Shadow, Bashful Blue, Night of Navy; Hollo's white; designer paper from unknown source
Ink: Versamagic Night Sky; Versafine Onyx Black; Versamark; Tombow markers N89 and 847; Stampin' Up marker Bashful Blue; Sakura Gelly Roll pen
Accessories: sponge; SU! ticket corner punch; Making Memories moulding strip, foam squares, clear EP
Thanks for looking! Stamp Happy!
Thursday, December 27, 2007
Cake, Glorious Cake!

Well, I'm finally getting around to the SCS Color Challenge from Christmas day! The sample card by Christy S (http://www.splitcoaststampers.com/gallery/photo/749192?cat=500&ppuser=79977) was so appealing to me because even though the colors are very traditional Christmas colors, her card wasn't Christmas-y at all. So I made it my personal challenge too, to make a card that wasn't for Christmas. Christy said her inspiration for the card was a Fazoli's ad with similar colors. Well, my DD's have had a box of candy canes sitting on the desk by the computer monitor for a week, and coincidentally the box is the same colors as the challenge too! So it was inspiring me.
Then I remembered this card by Michelle Boyer (http://www.splitcoaststampers.com/gallery/photo/151027?perpage=48&thumbsonly=0&thumbcheck=) It was one of the very first cards I ever put in my faves, because I loved the striped background. I even PM'd her and asked how she did it, and she told me it was just ink taken from the lid of her pad and painted on with an aqua painter! So that's what I ended up doing for my card for this challenge!
I used a Versamarker and Iridescent Ice EP on the cake and stars... if I had more time this morning I would have used Crystal Effects and Dazzling Diamonds instead. I have NO patience to wait for things to dry, though! The stars are from my snowflake Cuttlebug die, because I also have no patience for cutting out tiny things! Cutting out the cake was the extent for me today.
Stamps: Make a Wish by Gina K Designs
Cardstock: Stampin' Up Real Red, Glorious Green, Green Galore; Hollo's white; DCWV yellow (for star candle flames)
Ink: SU! Real Red, Glorious Green, Green Galore; Versafine Onyx Black
Accessories: Versamarker; SU! Iridescent Ice EP; clear EP (sentiment); Cuttlebug snowflake die (for stars) and Divine Swirls embossing folder; red dotted organdy (source unknown); foam squares
Monday, December 24, 2007
Merry Christmas, and Thank you!
Merry Christmas to all, and a big thank you to all of you who come to my blog to see what I've created! I appreciate everyone of you, and your comments always inspire me and bring a smile to my face! This card was made a few weeks ago, and I never got around to uploading it, so I thought I'd use it today as a thank you to all of you! Thank you, thank you, thank you from the bottom of my heart! I wish you all a very blessed, peaceful Christmas!Stamps: Kitchen Sink Stamps- snowflake stamp (promotional), sentiment from Thanks with Style, background starbursts from Backgrounds & Borders
Cardstock: Bazzill Basics; Basic Grey Figgy Pudding; Stampin' Up brushed silver; Hollo's white
Ink: Versamagic Night of Navy; Versamark
Accessories: clear EP; silver brads; silver cord; circle punches; Marvy super-jumbo scalloped circle; sheer white ribbon
Sunday, December 23, 2007
Whoop - de - do!
I have these Emerson stamps from American Art Stamps at the store, and they've been on the shelves forever! I don't know if they were funny at first, and now people are tired of them or what, but I'm trying to generate some renewed interest in them! I call them The PMS Stamps because they're all kinda' snarky and sarcastic... reminds of Maxine from Hallmark. Anyway, here's the first one I did yesterday, and used the new Daisy D's rub-on tape I have in stock for the faux stitches. My images is stamped on white cardstock from Hollo's using Versafine Onyx Black ink, and colored with Tombow markers. I used silver brads from Gary Burlin, and mounted my main image with foam squares. Cardstock is from Bazzill Basics, and the polka dot paper is from My Mind's Eye.Hope you're almost ready for Christmas, 'cause here it comes! Thanks for looking!
Wednesday, December 19, 2007
Mark your calendars!
Sunday, December 16, 2007
Featured Stamper challenge!

Thanks for looking! Stamp Happy!
Thursday, December 13, 2007
More fun...
Sorry for anyone waiting on details for these cards... my morning got away from me! The above card uses the Playful Christmas set from Kitchen Sink Stamps. I was "talking" with Maria and some other Crew Members yesterday about these dew drops that I have at the store and how I bought some for myself but hadn't used them yet because they weren't "Christmas-y!" Well, Maria said something to the effect of "you can make it work" so I just had to try! I think this is rather cute, and kinda' retro! The card base is Bazzill cardstock, the white is generic, and the orchid is Stampin' Up Orchid Opulence. I stamped the first layer of the tree in Versamagic Spring Pansy, and then the second layer is stamped with Versamagic Pretty Petunia. I adhered the dew drops with glue dots. The star was stamped with Versamark, then embossed with silver EP. I cut it out and mounted it to the tree top with a dimensional. I sponged some Spring Pansy ink around the edges. The sentiment is from Kitchen Sink Stamps Never a Loss 4 Words, and is stamped in Pretty Petunia then embossed with clear EP. Adhered a few more dew drops, tied on a bow and finished! This card measures 3"x3".
This card was created using more wonderful images sent to my by Cammie! The penguin and "Winter Wishes" sentiment are from 2 different Gina K Designs sets, and the Happy Holidays is from a retired Stampin' Up hostess set called Riveting. My designer paper is from a free package I got at Archiver's designed especially for them by ki memories. I colored the penguin with Tombow markers, and used a Sakura glaze pen on his hat brim and pom-pom. The edges of the penguin piece are done with a Daisy D's rub-on tape zig-zag stitch! It's the coolest thing... rub-on tape that comes in a dispenser, just like a mono-adhesive tape runner! Lots of fun! I added a Making Memories snowflake brad to the bottom left corner, and silver brads to the sentiment. Cardstock is Bazzill Basics (the red) and Stampin' Up Not Quite Navy.
Thanks for looking! Stamp happy!
Wednesday, December 12, 2007
Just Be-Claws!

Some more from the Sink!
Tuesday, December 4, 2007
Chocolate!
I have had several stamps sets from My Favorite Things (http://www.mftstamps.com/) at the store but they're not getting a whole lot of attention. My customers are still a little leary of clear stamps. So I grabbed this set today to bring home and make a few samples, and hopefully turn some heads. Only problem is, after I got done with this card I realized I can't display it at the store since I don't carry that particular ribbon, (or Stampin' Up cardstock!) in the store! Darn, I'll have to have more chocolate and start over again!Stamps: My Favorite Things - How Sweet It Is
Cardstock: Bazzill Basics (brown); Stampin' Up Soft Sky and Very Vanilla
Ink: Ranger Adirondack Pitch Black; Colorbox dark brown; Versamark
Accessories: Tombow markers; Cuttlebug tag die; 1" and 1 1/4" circle punches; May Arts ribbon; Martha Stewart baker's twine; pop-dots; glue dots; sponges
Thanks for looking! Stamp happy!
A Celery Tree!

Monday, December 3, 2007
Christmas Decor!


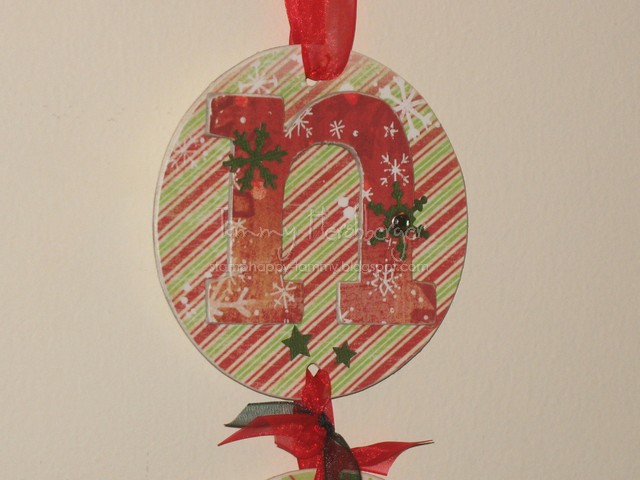
I was not in attendance at the Stampin' Up convention this past summer, but read several threads and saw a few pictures on SCS about a project that was done there using CD's covered in designer paper. This is my variation of the project, using round chipboard coasters! I finished this today, and immediately wanted to make more for Christmas gifts! But then realized, you can't do this without having to buy a whole set of alphabet letters to spell out "noel" over and over! Bummer! Someone needs to come up with chipboard letters sold in individual letter packages! If you know of a company that does, let me know! :)I used paper from the Holly Jolly Collection from Flair, and my chipboard letters are from Stampin' Up. The round coasters were given to me by my friend Trina, but I don't know where she got them. (Sorry!) I used modge-podge to adhere the DP to the coasters and letters, attached my different accessories and embellishments, then used red-line tape to adhere the letters to the coasters. I punched holes with my Crop-a-dile, and tied them all together using Stampin' Up red organdy ribbon, with some thinner green organdy ribbon. Other accessories used are: Letter n - snowflakes from Cuttlebug Snowflake #2 die cut; letter o - white snowflake brad from Making Memories, and red button from SU!; letter e - red ribbon from unknown source and Ice circle brad from SU!; letter l - red button from SU!, red star punched from EK Success punch, red velvet rick-rack from May Arts.
And voila'... the finished project!

Thanks for looking, and stamp happy!
Thursday, November 29, 2007
Peaceful Plum Snowflakes

Wednesday, November 28, 2007
Clear Sleeve Nugget Boxes

These two are made using my Kitchen Sink Stamps, and are going to be sent to two SCS'ers who I need to ELF! The blue one uses stamps from Snow Flurry. The blue cardstock is Bazzill Bling, and the eggplant is from Archiver's. I also used Stampin' Up Shimmer white and silver cardstock. The labels around the nuggets were stamped first with the giant snowflake swirl stamp in Versamagic Aspen Mist ink, then stamped again with silver Encore ink and embossed with clear embossing powder. I punched a scalloped circle with my Marvy super jumbo punch with silver cardstock for the center. I stamped the "stamped with loving hands" snowflake stamp on Shimmer white with Versamagic eggplant ink, embossed with clear EP, and punched out with a 1" circle. The "belly band" is just crimped with a paper crimper. The card uses the same inks, cardstock and stamp set, plus silver cord and ribbon from Michael's.
The pink set uses the Kitchen Sink Stamps Playful Christmas set, and I also used KSS Backgrounds & Borders for the starry snowflakes on my nugget labels. The labels were stamped with Versamagic Pink Petunia ink, then stamped with silver Encore ink and heat embossed. The tree in the circle center is also stamped with Pink Petunia, and then overstamped with Colorbox Warm Red. The cardstock for the box base is Bazzill Bling, the red cardstock is Bazzill Basics, and the white is SU! Shimmer. I again used the Marvy scalloped circle in super jumbo and a 1" circle punch for the center, along with the crimper for the band. The card is created with the same items as the box with the exception of the sparkly red ribbon that I had on hand but don't know the supplier.

This third set was made with stamps from a Paper Salon Tailored Tin called Winter Wonderland. I made this set to send to Kim Conlin, who is my Susan Gilman Company rep at the store. She has been so extremely helpful to me ever since I started my job at Toyrifix with advice and ideas, and is now helping me plan the Stamp Workshop Day for January. This little gift is in no way equal to all the help she's given me, but I hope it will in a small way let her know how much I appreciate all she's done! My cardstock used here is Bazzill Basics, along with Stampin' Up shimmer white and silver. I used Versafine Onyx Black ink to stamp the snowman then heat embossed with clear EP to keep the colors from bleeding when I colored it with Tombow markers. The mittens were stamped with Colorbox Blue Iris ink, and also heat embossed. I used the circle punches again on this set, and the crimper. I stamped "happy holidays" on the card with silver Encore ink, then heat embossed with clear EP. When I was heating the sentiment to emboss, the heat gun started to affect my ribbon and cord on the card, so I just let it do that and ended up with a neat effect, I think! The silver cord kind of frayed, and the sheer ribbon curled up a little.
I hope you'll give these a try soon! They're a really easy project, and will be loved by whoever you give them too! Stamp Happy!
Tuesday, November 27, 2007
New stamps from The Sink!

I also used the Backgrounds & Borders stamp set on this card. I stamped the cupcake using Ranger Adirondack Pitch Black ink, and colored it with my Copic markers. I then added stickles on the cupcake swirls, and a touch of glitter pen with my At You Spica marker on the bottom. There are also stickles on the candle flame. The sentiments are stamped with Versamagic Pretty Petunia ink, and the background is done with Versamark. Other ingredients are below.
Stamps: Kitchen Sink Stamps: Happy Birthday Cupcake, Never a Loss 4 Words, Backgrounds & Borders
Cardstock: Stampin' Up Cool Caribbean, Lovely Lilac, Almost Amethyst; Hollo's white
Ink: Adirondack Pitch Black; Versamagic Pretty Petunia; Versamark
Accessories: Copic markers, At You Spica glitter pen, Stickles, Marvy giga scalloped circle punch and mega circle punch, Fiskars circle cutter, Stampin' Up circle punches and ticket corner punch, 1/16" hole punch, Offray ribbon, silver cord, sponge, Stamp-a-ma-jig
Monday, November 26, 2007
More peppermint patties!

Sunday, November 25, 2007
Peppermint Patties

Thursday, November 22, 2007
Baby Sympathy cards
This first card is made with generic cardstock and Wild Asparagus designer paper. The heart image is from my new Stampin' Up set called Time Well Spent, and the sentiment is from my Kitchen Sink Stamps Never a Loss 4 Words. I used Versafine Onyx Black ink, Versamagic Aspen Mist around the edges of the white square, and Versamagic Spanish Olive for the sentiment. The heart is colored with Bashful Blue, Mellow Moss, and Summer Sun SU! markers, and the main image panel is raised up on dimensionals.
These cards were created using the retired Rose Romance cardstock from Stampin' Up along with Pretty in Pink and Very Vanilla. I also used a light green Bazzill cardstock and designer paper from Anna Griffin. The flower stamp is from Inky Antics, and the sentiment is from Kitchen Sink Stamps Never a Loss 4 Words. I used Versamagic Pixie Dust ink for the flower base, and Pink Petunia for the flower petals and the sentiment. I inked the edges of the center square with Versamagic Aloe Vera ink. The ink strip was scalloped using my SU! corner rounder punch, and I added some pink Offray grosgrain for a finishing touch.
At the suggestions of another SCS'er, I created these cards with the butterfly image from my SU! Time Well Spent set. The sentiment is from Kitchen Sink Stamps. My light green and moss green cardstocks are generic, and I also used SU! Taken with Teal and Very Vanilla. Both pieces of designer paper are from Paper Salon. I inked the butterfly and sentiment with Versamagic Sage ink and also inked the edges of the center square with it.
These last cards are the ones I am most unsure about, as they didn't turn out very "baby-ish" but then again, I'm not sure they need be. All stamps are from Kitchen Sink Stamps... the 3-Step Daisy set, and Never a Loss 4 Words. Cardstock used is Stampin' Up Ruby Red, Blush Blossom and Very Vanilla, and designer paper is My Mind's Eye. I inked the daisy with Blush Blossom and Ruby Red, then inked the daisy center with Versamagic Jumbo Java. I inked the leaves with Versamagic Sage and Hint of Pesto, then spritzed the images with my color spritzer and Blush Blossom marker. The sentiment is stamped with Versamagic Red Brick. I added vanilla grosgrain ribbon to the dotted panel.I hope you like my cards (and I hope Patti can use them and likes them, too!) I hope they'll inspire you to try to make some cards for the NICU also! Thanks in advance for your help!
I hope everyone had a blessed Thanksgiving Day! Stamp Happy!
Wednesday, November 21, 2007
Holly & Figgy Pudding

Sorry for the delay in the details on this card! It's been a busy day! I created this card based on the SCS sketch challenge for today. The holly and sentiment are from my Kitchen Sink Stamps, the 3-step Holly & Mistletoe set. The holly was stamped first with Versamagic Chalk ink in sage. I inked the second stamp with Versamagic Hint of Pesto and stamped it off once to lighten before stamping my image. The third step was stamped with Hint of Pesto... full strength! The holly berries are stamped with Pixie Pink Versamagic, then Red Brick stamped off once, and the third time with Red Brick full strength. I stamped the sentiment with Red Brick also. I used my Stampin' Up Color Spritzer and spritzed the white panel with my SU! Mellow Moss marker. The cardstock is all Bazzill except for the white which I get at Hollo's. The designer paper is Figgy Pudding from Basic Grey, and that yummy faux seude red ribbon is from May Arts. The antique brads are from a source long ago forgotten! The main panel is raised up on dimensionals.
Thanks for looking, and Happy Thanksgiving! Stamp Happy!
Holiday Gift Ideas

This first project is a Gift Card holder! Instructions to make you own can be found here... http://www.splitcoaststampers.com/resources/giftcardholder.php. This was fun and easy to make. I decided to alter my design slightly and make a tag out of the top piece. The stamps are from Art Impressions. The "To:/From:" is stamped in Merlot Colorbox ink. The holly and berries were colored with Tombow markers, and there is Soft Sage Memories ink sponged around the edges of the tag. To create the "holder" there are scored lines on the long, folded piece that create a very short box-like piece, and then a small coin envelope is mounted inside for your gift card to slide into! The pattern on SCS calls for 2 envelopes inside so you have one for your sentiment but in this case I chose only one envelope. Less confusion in the class and less time spent creating!
This next project is a Post-It Note holder. I found instructions for it long ago on someone's blog, I think! It is 2 pieces of chipboard coaster cut to 3 1/2" squares. The snowman paper is cut in 4 1/2" squares, and folded around each side of the coasters and attached with red-line tape. Inside, the light blue cardstock is cut 7" x 3 3/8" and is scored 3 1/4" from each end to create a "pocket" at the top for the post-it notes. Then we just stamped this little "Joy" stamp from Hero Arts in silver Encore ink, punched out scalloped circles with Marvy extra jumbo and super jumbo punches, attached a silver snowflake brads, and adhered! Cute and EASY! You could turn out a bunch of these for gifts in an evening!
This last project was everyone's favorite because it involved CHOCOLATE! This is a Nugget Box! You can find instructions for your own box here... http://www.splitcoaststampers.com/forums/showthread.php?t=190469 and if you read through the first few posts, you'll find there are instructions/patterns for nugget boxes of all sizes there! I owe many thanks to Chris Simon on SCS for re-writing this 3x15 pattern for me with alternate measurements so my customers could use the Scor-It to score all the lines on the boxes. The stamps on the box top are from Art Impressions. The serpentine swirls are stamped with Memories soft sage ink, and the sentiment is stamped with Colorbox warm red. The labels for the nuggets are also stamped with the serpentine swirls and letters in warm red. These are also very easy to make... don't be intimidated! These would be a big hit as teacher gifts and perfect for man or woman!Thanks for looking! I wish everyone a very happy and blessed Thanksgiving Day! Stamp Happy!
Sunday, November 18, 2007
Snowflakes!

Saturday, November 10, 2007
Fall Cards Class

This first card was my very favorite, but also gave me the most grief! I really struggled with how to color the image! It's hard because things I have here at home and are comfortable using, or things I would have used as a Stampin' Up demo, are not necessarily what I have available at the store. I tried making markers work with this and it wasn't pretty! I finally settled for a Tombow marker #912 to highlight the shadowing on the pumpkins, and another Tombow marker #856 for the berries. The rest was colored with chalks, and I think turned out beautifully! My customers were a little leary of the chalks, but once they got started their images were gorgeous and it was neat to see how different each one turned out! Some people were very heavy-handed so their pumpkins and all were very bright and bold. Some were lighter, like me. The cardstock on the card is all Bazzill. I used a circle Coluzzle to cut out the circular window, and the green panel is then raised up on foam squares. The pumpkin patch stamp is from Northwoods.
This second card was created using all stamps from Stamps by Judith and Heather. I have a few customers that are very loyal to her company and stamps, but I think I may discontinue carrying them. I personally like some of the images, but her company is difficult to deal with and requires a large minimum order every time. This card was also CASE'd from the Judith idea catalog. The leaves are stamped with Ancient Page black, and colored with a variety of Tombow markers in fall colors. "Be thankful" is stamped with tangerine Colorbox chalk ink, as are the leaves in the background on the orange panel. The maple leaf brad is from an unknown source (found it in my box of brads just laying loose!) For the class I purchased oak leaf brads from Hero Arts. All cardstock is Bazzill. I also thought the different-size card would be a neat change-up for the class, but something to remember with this size of card is it wastes a whole sheet of 8 1/2 x 11 cardstock for just one card!
This card may look familiar... I might have uploaded it previously. The tree/rake stamp and the sentiment are all from Serendipity stamps. The tree was watercolored using Memories chestnut brown ink and an aquapainter. The sentiment is stamped with eggplant Colorbox pigment ink, and then embossed with Moon Glow copper embossing powder. The edges of the main panel are inked with Memories soft vanilla ink, and the chestnut ink. The whole panel was then spritzed with Moon Glow's Moon Shadow mist... can't remember the exact color but it was a copper. It gave it a gorgeous shimmer! If I remember correctly, I think I CASE'd most of this design from the Serendipity catalog.
I was also pretty pleased with the results on this last card. The cardstock is all Bazzill, and the striped paper is from Flair. The long panel is a regular-size Rollograph wheel from Clearsnap called Harvest. It is inked with sepia Ancient Page ink. The sentiment is inked with olive pastel Colorbox chalk ink and unfortunately my memory escapes me this morning and I don't remember where that stamp came from... possibly Serendipity? I used my Crop-a-dile to set the We R Memory Keepers eyelet, and tied a piece of twill through it. For the class I had customers knock off 2 corners of the sentiment panel and the mat and centered the eyelet and twill to make it look more like a tag.Thanks for checking out my fall cards! I'm off to work today, and hope to have time to play while I'm there! The whole stamping department has been cleaned up, reorganized, etc. and there is now a need for more demo samples on the floor so send good stamping vibes my way for quiet time today for stamping!
Stamp Happy!
Monday, November 5, 2007
Bliss... a day off!

I finally got to play with some of my new Kitchen Sink Stamps this evening! I hope that you've all been chomping at the bit to see more of these great stamps! This first card uses the Playful Alphabet for the letter C, and the "congratulations" comes from a set to be released later this month called "Never a Loss 4 Words." It is an AWESOME set! You will never need another word/sentiment set again! My cardstock on this card is all Stampin' Up... Purely Pomegranate, Chocolate Chip and Very Vanilla. I made the scallops using my corner rounder with the guard removed. The chocolate ribbon is from Joann's. I stamped swirled images from my Kitchen Sink Backgrounds and Borders set on the Vanilla cardstock with Frost White Colorbox ink. It didn't turn out quite the way I wanted... I stamped it first and let it dry, then stamped it again and embossed with clear. I may have to do it over again... it'll keep me up nights! The "c" was double-stamped with SU! Purely Pomegranate classic ink, and I cut one letter out and mounted it above the other. The "ongratulations" is stamped with Versamagic Jumbo Java ink. Both are embossed with clear EP.
This last picture is a "sneak peek" of a new set soon to be released! Doesn't it look YUMMY???
Wednesday, October 31, 2007
Beauty from The Sink!

Have you ever had anything this beautiful come out of your Kitchen Sink? LOL This 3-Step Daisy set from Kitchen Sink Stamps continues to amaze me! I just love what can be created with it!
This card is for our wonderful friend, Carol. She's the wife of our family friend who died on Sunday. I hope it brings her some cheer, along with the apple crisp I made for the family!
The stamp set I used is, of course, the 3-Step Daisy and the sentiment comes from that set, too. I inked the first layer of the daisy with Versacolor white, then edged it with a little bit of Smoke Blue Colorbox ink. The second layer I inked with Stampin' Up Going Gray, stamped it off once to remove some ink, then stamped the flower. The third layer is stamped with Going Gray, fully inked. The daisy center was stamped with Versamark, then I sprinkled it with Moon Glow yellow embossing powder. The leaves were stamped with Versamagic Sage and Spanish Olive. The sentiment was stamped with Spanish Olive, also and embossed with clear embossing powder.
Remember, only 1 day until the release of 4 new Holiday Stamp Sets from Kitchen Sink Stamps! Remember to look for the banner ad on Thursday, November 1st at www.splitcoaststampers.com to purchase the new stamps and get a 15% discount!!!
Stamp happy!
One more day to NEW STAMPS!

I can't get this banner to animate, and show you the words "4 New Holiday Sets" or to tell you specifically that they'll be released on November 1st, but you get the gist, right? Be sure to go to http://kitchensinkstamps.com for the online store, and click on the link for "Sink News" to go to Maria's blog and get a sneak peek at some of the new sets! Then, right away tomorrow morning, go to http://splitcoaststampers.com and look for the banner ad! Click on it to take you to the store, where you'll receive 15% off your total purchase on November 1st! Can't beat that! Great new stamps, with a great discount! I promise, you'll love the stamps! :)
Tuesday, October 30, 2007
Are you ready for some new STAMPS!!!

Sunday, October 28, 2007
sadness
That's it.... just a plain black square. Our family lost a very dear friend to cancer this evening. I had made a few cards today that I intended to upload tonight but it's now furthest from my mind, so it's just a black square. This man was the absolute very nicest man you could ever hope to meet, let alone call a friend. Just one of those people that you're very lucky to have known... you know what I mean? Always kind and good to everyone, always there to help, always giving more than he got. And it's completely and utterly unfair that his life is over at age 55. And he leaves behind a wonderful family... a wife, 3 awesome kids, a daughter-in-law, 2 beautiful grandchildren, brothers, his mother, nieces and nephews and a ton of people that we so lucky to have had him touch our lives. If you are so inclined, please include the Lantz family in your prayers. And remember to let everyone in your life know how much they mean to you! Say "I love you" until you can't say it anymore!